设计原则
单⼀职责原则 :⼀个类应该仅有⼀个引起它变化的原因。开放封闭原则 :软件实体可以扩展,但是不可修改。即⾯对需求,对程序的改动可以通过增加代码来完成,但是不能改动现有的代码。⾥⽒代换原则 :⼀个软件实体如果使⽤的是基类,则⼀定适⽤于其派⽣类。即把基类替换成派⽣类,程序的⾏为没有变化。依赖倒转原则 :抽象不应该依赖细节,细节应该依赖抽象。即针对接⼝编程,不要对实现编程。迪⽶特原则 :不直接通信的两个类不应发⽣直接相互作⽤,可以通过第三个类转发这个调⽤。接⼝隔离原则 :每个接⼝中不存在派⽣类⽤不到却必须实现的⽅法,否则就要将接⼝拆分,使⽤多个隔离的接⼝。
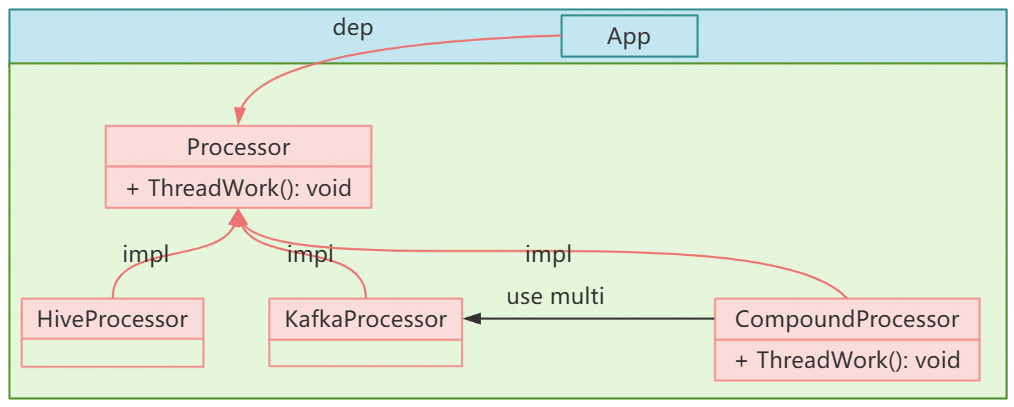
组合模式 需求变化,需要组合多个Processor实例功能
1
2
3
4
5
6
7
8
9
10
11
12
13
14
15
16
17
18
19
20
21
22
23
24
25
26
27
28
29
30
31
32
class Processor { public : virtual void ThreadWork () 0 ; }; class HiveProcessor : public Processor { public : void ThreadWork () override "ConsumeHive" << endl; } }; class KafkaProcessor : public Processor { public : void ThreadWork () override "ConsumeKafka" << endl; } }; class CompoundProcessor : public Processor { public : void AddProcessor (unique_ptr<Processor> p) processors_.emplace_back (std::move (p)); } void ThreadWork () override for (auto & p : processors_) { p->ThreadWork (); } } list<unique_ptr<Processor>> processors_; }; int main () CompoundProcessor cp; cp.AddProcessor (make_unique <HiveProcessor>()); cp.AddProcessor (make_unique <KafkaProcessor>()); Processor *p = &cp; p->ThreadWork (); }
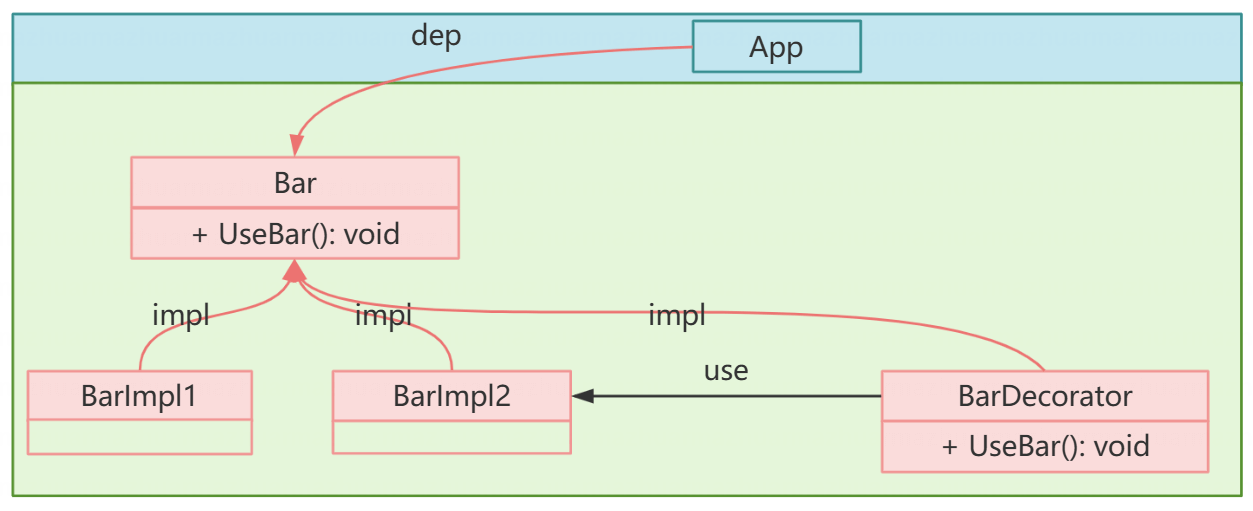
装饰模式 需求变化,需要在现有 Bar 的实现上添加特定功能 。通过组合方式 实现功能扩展更灵活,能够动态地改变对象的行为
1
2
3
4
5
6
7
8
9
10
11
12
13
14
15
16
17
18
19
20
21
22
23
24
25
26
27
28
29
30
31
32
33
class Bar { public : virtual void UseBar () 0 ; virtual ~Bar () = default ; }; class BarImpl : public Bar { public : void UseBar () override "UseBar" << endl; } }; class BarDecorator : public Bar { public : BarDecorator (unique_ptr<Bar> bar) : bar_ (std::move (bar)) {} protected : unique_ptr<Bar> bar_; }; class BarDecoratorFilter : public BarDecorator { public : BarDecoratorFilter (unique_ptr<Bar> bar) : BarDecorator (std::move (bar)) {} void UseBar () override Dofilter (); bar_->UseBar (); } private : void Dofilter () "DoFilter" << endl; } }; int main () auto bar_ptr = make_unique <BarImpl>(); unique_ptr<Bar> bar = make_unique <BarDecoratorFilter>(std::move (bar_ptr)); bar->UseBar (); }
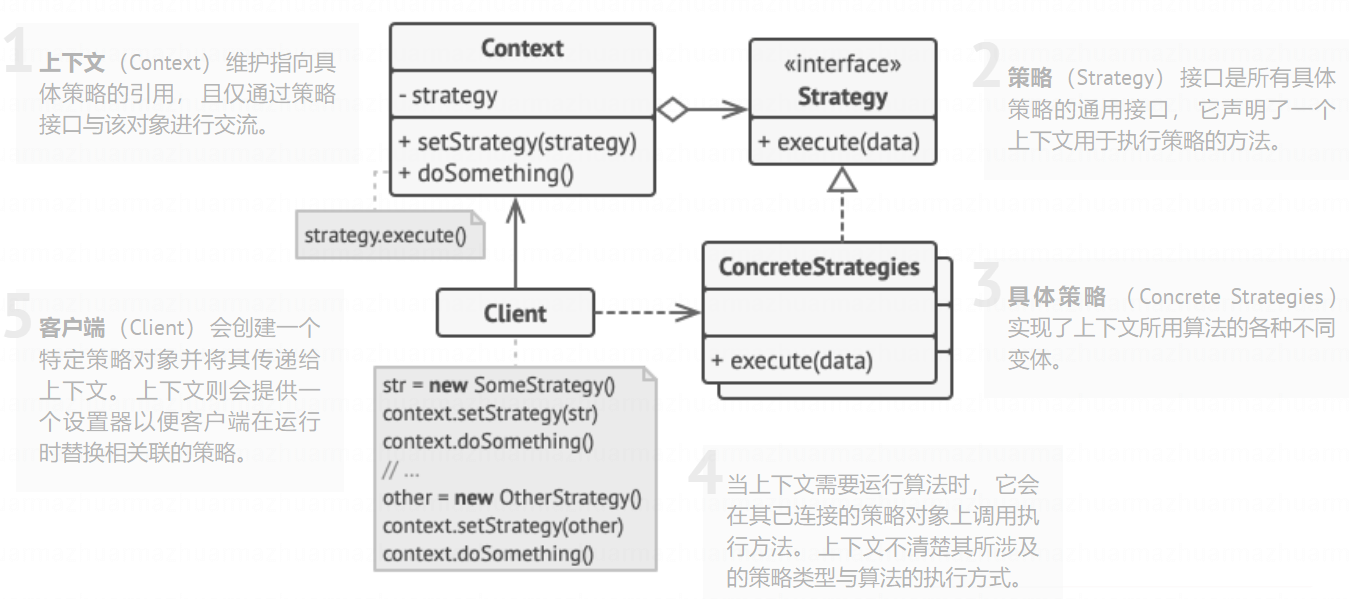
策略模式 定义一系列算法,把他们一个个封装起来,并且使他们可以互相替换。
策略模式 + 工厂模式 写一个类 Foo,根据不同 type 执行对应 strategy 类的 Execute 函数,type 种类会随着需求不断增加
1.朴素写法:违反开闭原则,不方便添加新 strategy
1
2
3
4
5
6
7
8
9
10
11
12
13
14
15
16
17
18
19
20
21
22
23
24
25
26
class StrategyA {public : void Execute () "execute type 1" << endl; } }; class StrategyB {public : void Execute () "execute type 2" << endl; } }; class Foo {public : void ExecuteByType (int type) if (type == 1 ) { StrategyA sta; sta.Execute (); } else if (type == 2 ) { StrategyB stb; stb.Execute (); } } }; int main () Foo f; f.ExecuteByType (1 ); f.ExecuteByType (2 ); }
2.采用工厂模式优化,动态创建 strategy 对象,但 if-else 仍违反开闭原则
1
2
3
4
5
6
7
8
9
10
11
12
13
14
15
16
17
18
19
20
21
22
23
24
25
26
27
28
29
30
31
32
33
34
class Strategy {public : virtual void Execute () 0 ; }; class StrategyA : public Strategy {public : void Execute () override "execute type 1" << endl; } }; class StrategyB : public Strategy {public : void Execute () override "execute type 2" << endl; } }; class StrategyFactory {public : static unique_ptr<Strategy> createStrategy (int type) if (type == 1 ) { return make_unique <StrategyA>(); } else if (type == 2 ) { return make_unique <StrategyB>(); } else { return nullptr ; } } }; class Foo {public : void ExecuteByType (int type) createStrategy (type)->Execute (); } }; int main () Foo f; f.ExecuteByType (1 ); f.ExecuteByType (2 ); }
3.采用策略模式+工厂模式进一步优化,满足开闭原则
1
2
3
4
5
6
7
8
9
10
11
12
13
14
15
16
17
18
19
20
21
22
23
24
25
26
27
28
29
30
31
32
33
34
35
36
37
38
39
40
41
42
43
44
45
46
47
48
49
50
51
class Strategy ;class StrategyFactory {public : static unique_ptr<Strategy> createStrategy (int type) return strategies[type](); } static void registerStrategy (int type, function<unique_ptr<Strategy>()> create_fn) strategies[type] = create_fn; } private : static unordered_map<int , function<unique_ptr<Strategy>()>> strategies; }; unordered_map<int , function<unique_ptr<Strategy>()>> StrategyFactory::strategies; class Strategy {public : virtual void Execute () 0 ; }; class StrategyA : public Strategy {public : static void registerStrategy () StrategyFactory::registerStrategy (1 , []() -> unique_ptr<Strategy> { return make_unique <StrategyA>(); }); } void Execute () override "execute type 1" << endl; } }; class StrategyB : public Strategy {public : static void registerStrategy () StrategyFactory::registerStrategy (2 , []() -> unique_ptr<Strategy> { return make_unique <StrategyB>(); }); } void Execute () override "execute type 2" << endl; } }; class Foo {public : explicit Foo () StrategyA::registerStrategy (); StrategyB::registerStrategy (); } void ExecuteByType (int type) createStrategy (type)->Execute (); } }; int main () Foo f; f.ExecuteByType (1 ); f.ExecuteByType (2 ); }
单例模式 系统只需要⼀个实例对象,或客户调⽤类的单个实例只允许使⽤⼀个公共访问点
1 2 3 4 5 6 7 8 9 10 11 12 13 14 15 16 17 18 19 20 21 22 23 24 25 26 27 28 29 30 class Single {public : static Single* getInstance () static Single ins; return &ins; } Single (const Single&) = delete ; Single (Single&&) = delete ; Single& operator =(const Single&) = delete ; private : Single () = default ; virtual ~Single () = default ; }; class Single {public : static Single* getInstance () return ins; } Single (const Single&) = delete ; Single (Single&&) = delete ; Single operator =(const Single&) = delete ; private : Single () = default ; virtual ~Single () = default ; static Single *ins; }; Single* Single::ins = new (nothrow) Single;
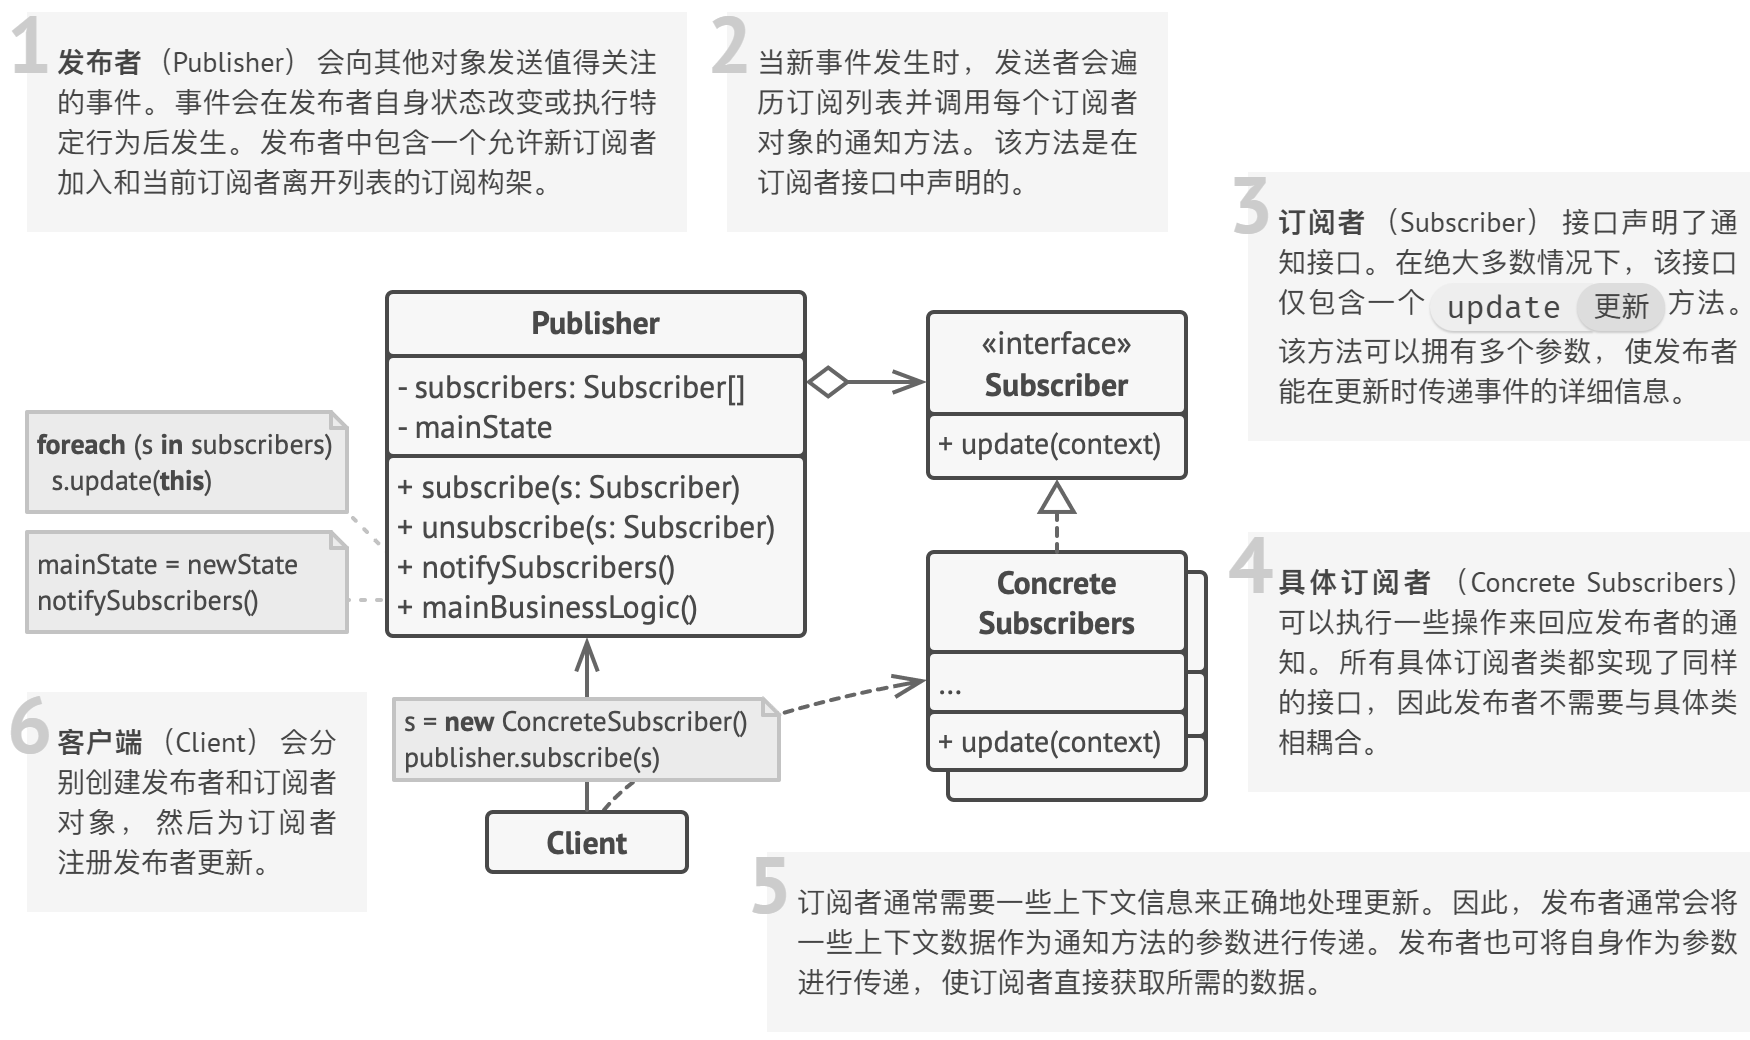
观察者模式 定义一种订阅机制,可在对象事件发生时通知多个观察者对象。
观察者:内部包含被观察者对象,当被观察者对象的状态发⽣变化时,更新⾃⼰的状态。(接收通知更新状态)
被观察者:内部包含了所有观察者对象,当状态发⽣变化时通知所有的观察者更新⾃⼰的状态。(发送通知)
应⽤场景:
当⼀个对象的改变需要同时改变其他对象,且不知道具体有多少对象有待改变时,应该考虑使⽤观察者模式;⼀个抽象模型有两个⽅⾯,其中⼀⽅⾯依赖于另⼀⽅⾯,这时可以⽤观察者模式将这两者封装在独⽴的对象中使它们各⾃独⽴地改变和复⽤。
1
2
3
4
5
6
7
8
9
10
11
12
13
14
15
16
17
18
19
20
21
22
23
24
25
26
27
28
29
30
31
32
33
34
35
36
37
38
39
40
41
42
43
44
45
46
47
48
49
50
51
52
53
54
55
56
57
58
59
60
61
62
63
64
65
66
67
68
69
70
71
72
73
74
75
76
77
78
79
80
81
class Subject ;class Observer {public : Observer (string name, Subject *sub) { this ->name = name; this ->sub = sub; } virtual void update () 0 ; protected : string name; Subject *sub; }; class StockObserver : public Observer {public : StockObserver (string name, Subject *sub) : Observer (name, sub){} void update () cout << name << " 收到消息:" << sub->action << endl; if (sub->action == "⽼板来了!" ) { cout << "我⻢上关闭股票,装做很认真⼯作的样⼦!" << endl; } } }; class NBAObserver : public Observer {public : NBAObserver (string name, Subject *sub) : Observer (name, sub){} void update () cout << name << " 收到消息:" << sub->action << endl; if (sub->action == "⽼板来了!" ) { cout << "我⻢上关闭 NBA,装做很认真⼯作的样⼦!" << endl; } } }; class Subject {protected : std::list<Observer*> observers; public : string action; virtual void attach (Observer *) 0 ; virtual void detach (Observer *) 0 ; virtual void notify () 0 ; }; class Secretary : public Subject { void attach (Observer *observer) observers.push_back (observer); } void detach (Observer *observer) auto iter = observers.begin (); while (iter != observers.end ()) { if ((*iter) == observer) { observers.erase (iter); return ; } ++iter; } } void notify () list<Observer *>::iterator iter = observers.begin (); while (iter != observers.end ()) { (*iter)->update (); ++iter; } } }; int main () Subject *BOSS = new Secretary (); Observer *a = new NBAObserver ("a" , BOSS); Observer *b = new StockObserver ("b" , BOSS); BOSS->attach (a); BOSS->attach (b); BOSS->action = "去吃饭了" ; BOSS->notify (); cout << endl; BOSS->action = "⽼板来了" ; BOSS->notify (); }
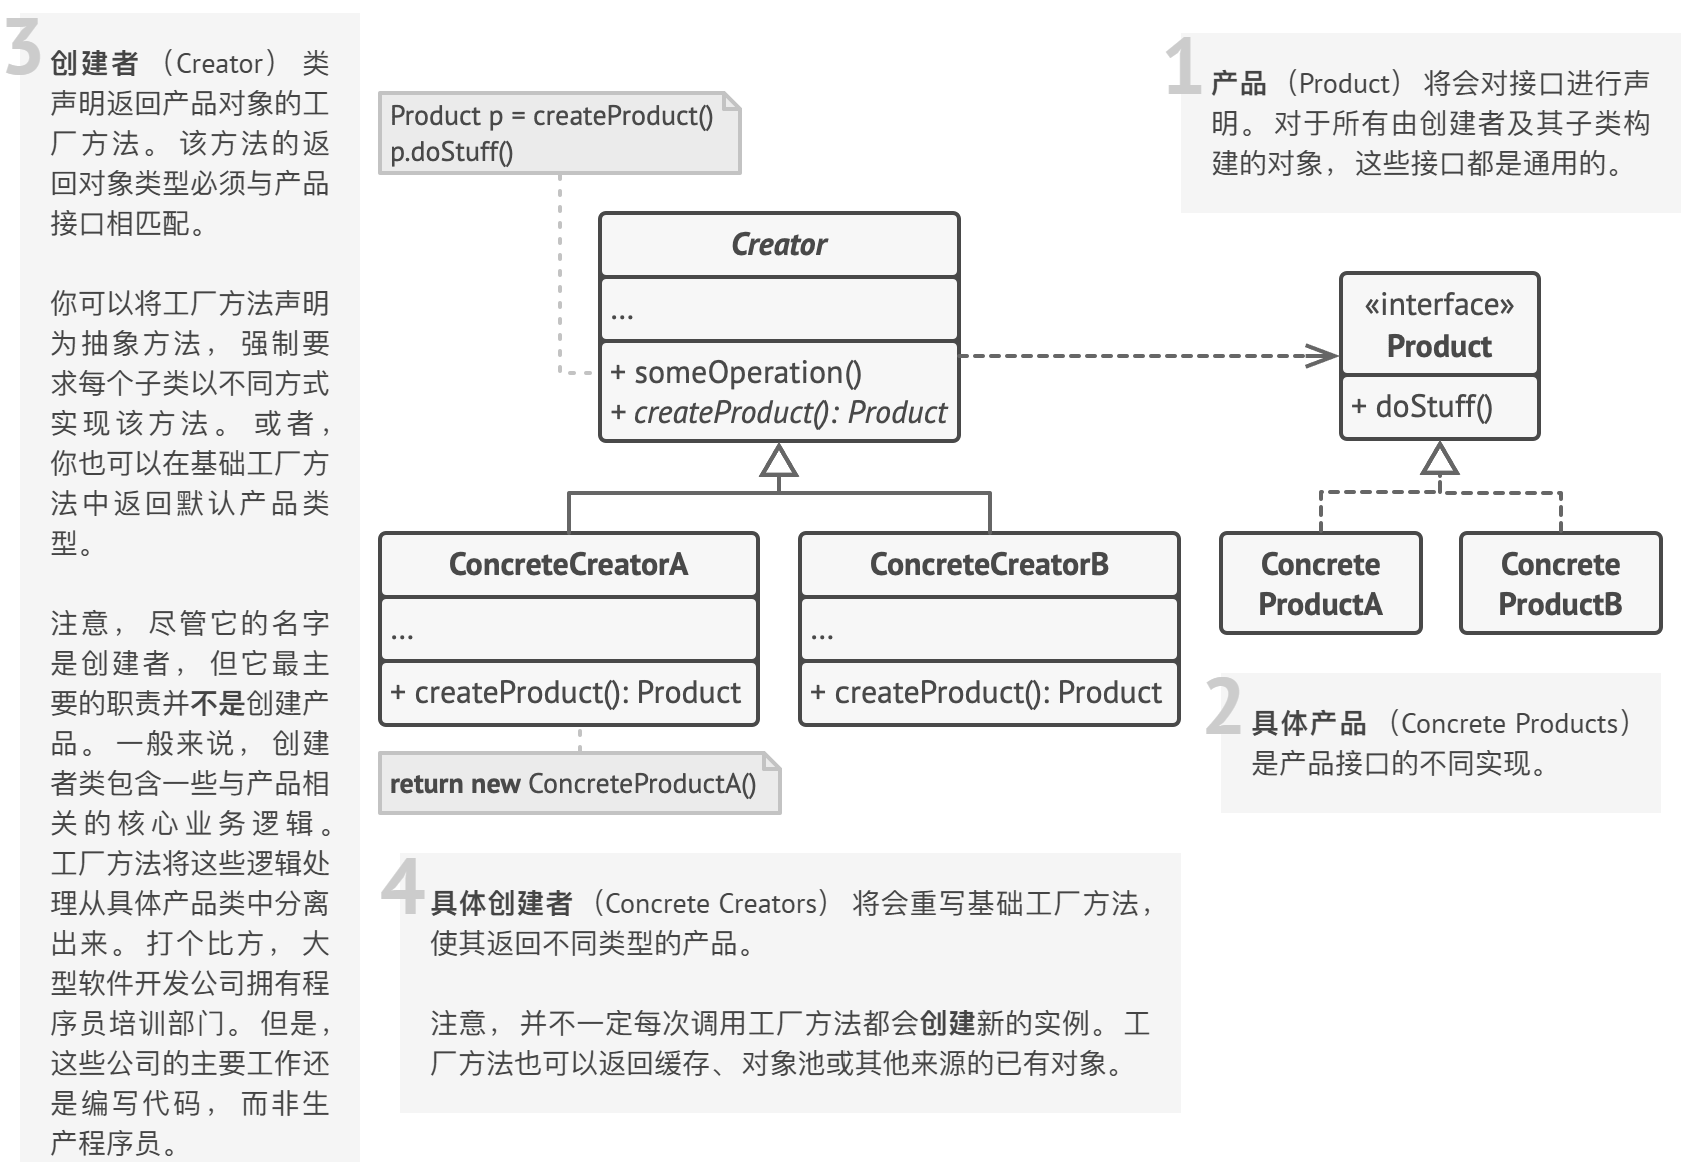
⼯⼚模式 工厂方法和抽象工厂的区别
工厂方法模式只有一个抽象产品类,而抽象工厂模式有多个
工厂方法模式的具体工厂类只能创建一个具体产品类的实例,而抽象工厂模式可以创建多个
工厂方法在增加一个具体产品的时候,都要增加对应的工厂,而抽象工厂模式只有在新增一个类型的具体产品时才需要新增工厂
工厂方法模式 工厂方法模式是一种创建型设计模式,其在父类中提供一个创建对象的方法,允许子类决定实例化对象的类型。
优点 :
一个调用者想创建一个对象,只要知道其名称就可以了。
扩展性高,如果想增加一个产品,只要扩展一个工厂类就可以,符合开闭原则
屏蔽产品的具体实现,调用者只关心产品的接口。
缺点 :每加一个产品,需要额外加一个产品工厂的类,增加了额外的开销。
结构
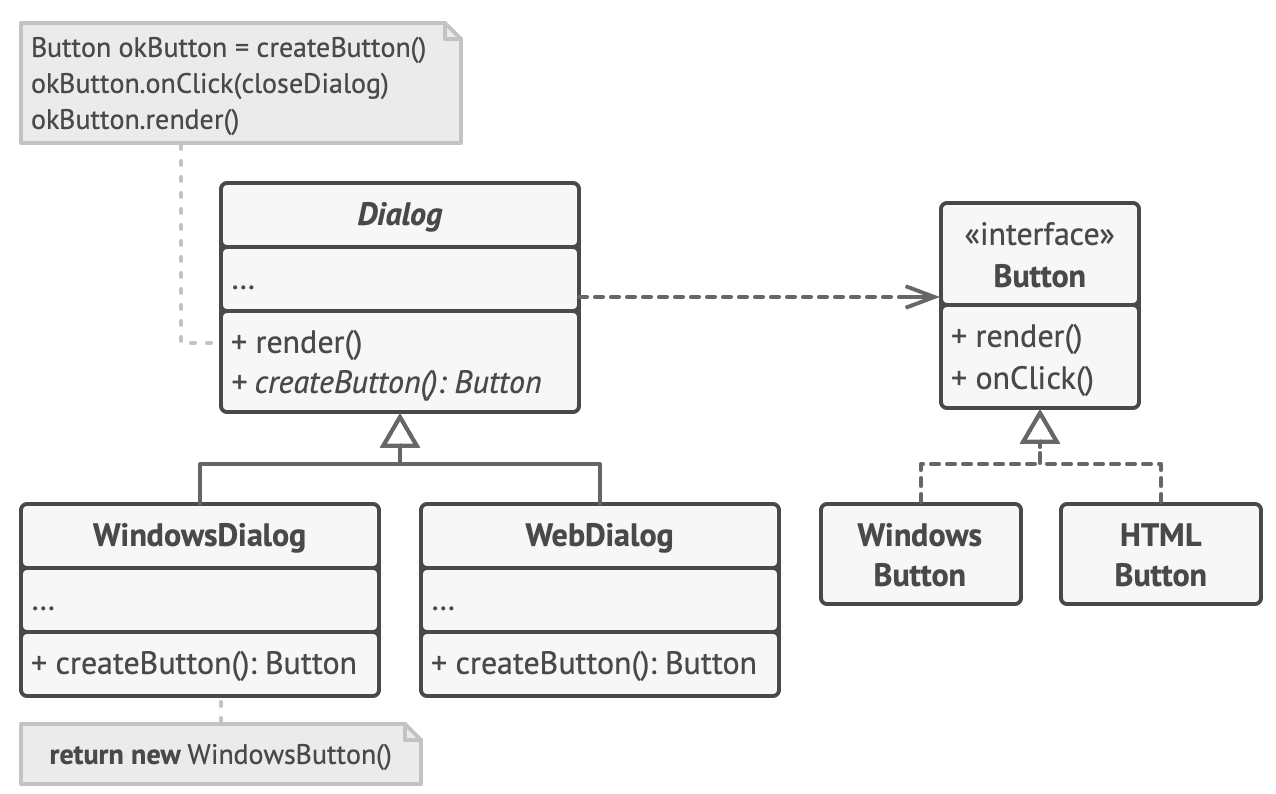
伪代码 以下示例演示了如何使用工厂方法开发跨平台 UI (用户界面) 组件, 并同时避免客户代码与具体 UI 类之间的耦合。
基础对话框类使用不同的 UI 组件渲染窗口。 在不同的操作系统下, 这些组件外观或许略有不同, 但其功能保持一致。 Windows 系统中的按钮在 Linux 系统中仍然是按钮。
如果使用工厂方法, 就不需要为每种操作系统重写对话框逻辑。 如果我们声明了一个在基本对话框类中生成按钮的工厂方法, 那么我们就可以创建一个对话框子类, 并使其通过工厂方法返回 Windows 样式按钮。 子类将继承对话框基础类的大部分代码, 同时在屏幕上根据 Windows 样式渲染按钮。
如需该模式正常工作, 基础对话框类必须使用抽象按钮 (例如基类或接口), 以便将其扩展为具体按钮。 这样一来, 无论对话框中使用何种类型的按钮, 其代码都可以正常工作。
1 2 3 4 5 6 7 8 9 10 11 12 13 14 15 16 17 18 19 20 21 22 23 24 25 26 27 28 29 30 31 32 33 34 35 36 37 38 39 40 41 42 43 44 45 46 47 48 49 50 51 52 53 54 55 56 57 58 59 60 61 62 63 64 65 66 class Dialog is abstract method createButton () :Button // 请注意,创建者的主要职责并非是创建产品。其中通常会包含一些核心业务 // 逻辑,这些逻辑依赖于由工厂方法返回的产品对象。子类可通过重写工厂方 // 法并使其返回不同类型的产品来间接修改业务逻辑。 method render() is // 调用工厂方法创建一个产品对象。 Button okButton = createButton () okButton.onClick (closeDialog) okButton.render () class WindowsDialog extends Dialog is method createButton () :Button is return new WindowsButton() class WebDialog extends Dialog is method createButton():Button is return new HTMLButton() // 产品接口中将声明所有具体产品都必须实现的操作。 interface Button is method render() method onClick(f) // 具体产品需提供产品接口的各种实现。 class WindowsButton implements Button is method render(a, b) is // 根据 Windows 样式渲染按钮。 method onClick(f) is // 绑定本地操作系统点击事件。 class HTMLButton implements Button is method render(a, b) is // 返回一个按钮的 HTML 表述。 method onClick(f) is // 绑定网络浏览器的点击事件。 class Application is field dialog: Dialog // 程序根据当前配置或环境设定选择创建者的类型。 method initialize() is config = readApplicationConfigFile () if (config.OS == "Windows" ) then dialog = new WindowsDialog () else if (config.OS == "Web" ) then dialog = new WebDialog () else throw new Exception ("错误!未知的操作系统。" ) method main () is this .initialize () dialog.render ()
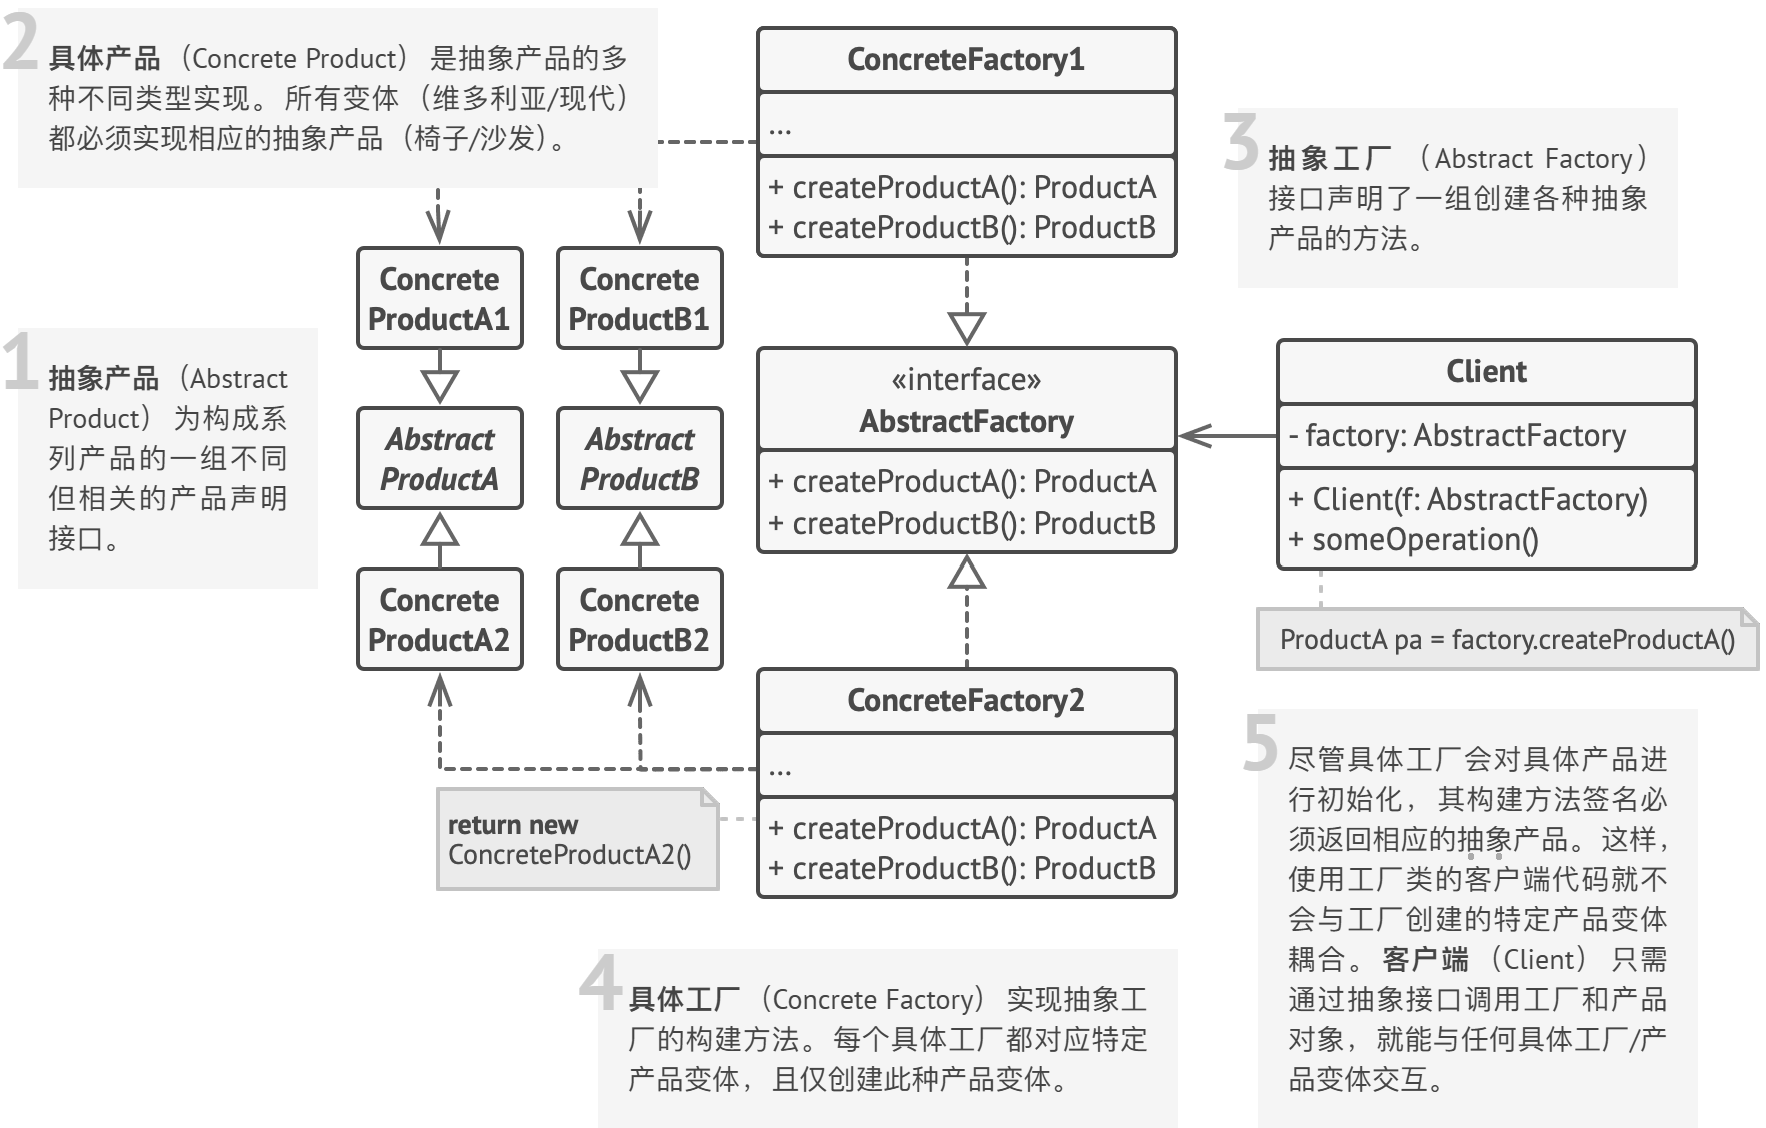
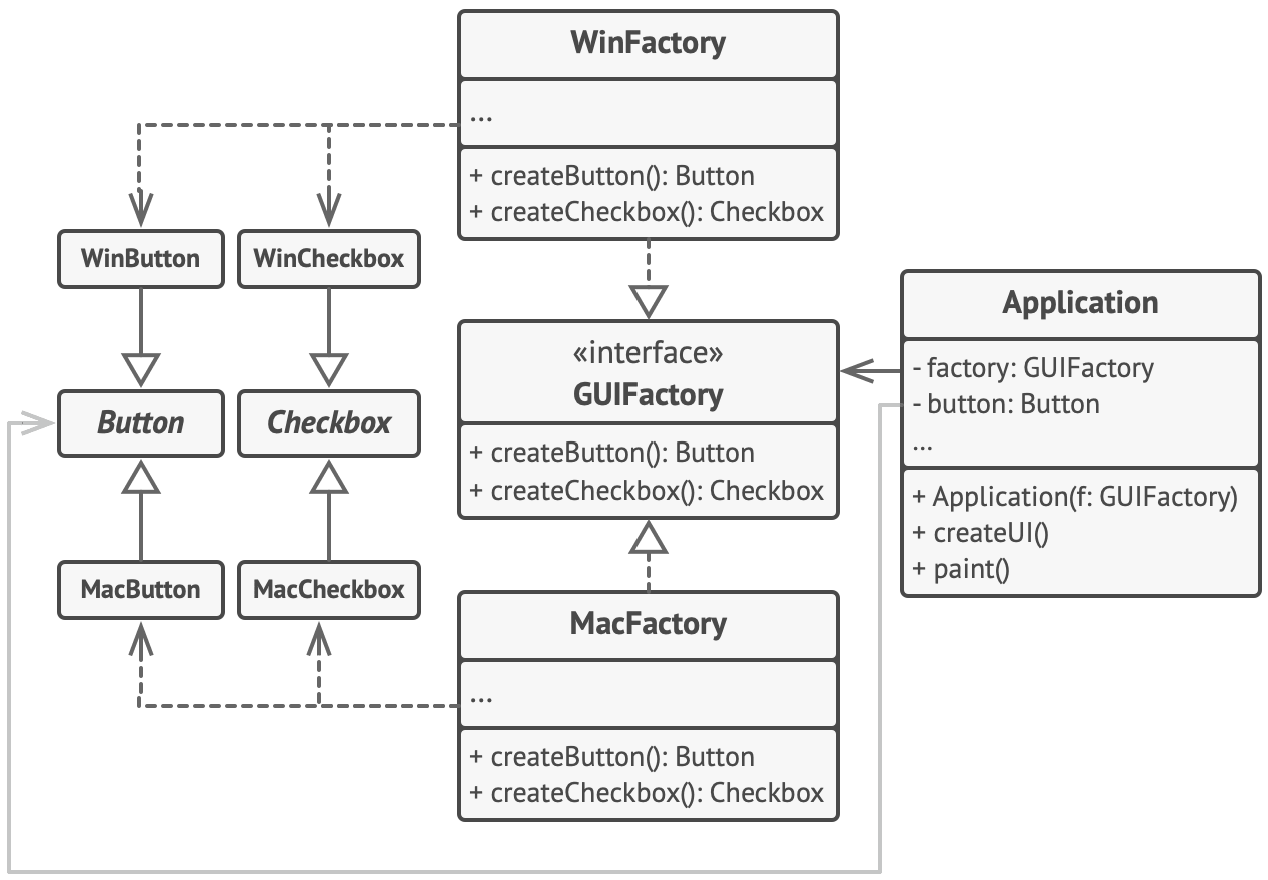
抽象工厂 由于工厂方法模式中的每个工厂只生产一类产品,可能会导致系统中存在大量的工厂类。
因此可以将相关的产品组成一个产品族 (如button、checkbox),由同一个工厂来统一生产(该工厂能同时创建button和checkbox),不同工厂生产不同系列 (mac、win),这就是抽象工厂模式的基本思想。
好处 :
易于交换产品系列,只需要应用中根据环境初始化一次,就能切换成一种对应的具体工厂(mac or win),从而可以使用不同的产品配置。
让客户端不关心具体创建过程,只需要通过抽象接口操纵实例,产品的具体类名也被具体工厂的实现分离,不会出现在客户代码中。
缺点 :如果要添加一个产品类,就得增加很多代码
结构
伪代码 下面例子通过应用抽象工厂模式, 使得客户端代码无需与具体 UI 类耦合, 就能创建跨平台的 UI 元素, 同时确保所创建的元素与指定的操作系统匹配。
跨平台应用中的相同 UI 元素功能类似, 但是在不同操作系统下的外观有一定差异。 此外, 你需要确保 UI 元素与当前操作系统风格一致。 你一定不希望在 Windows 系统下运行的应用程序中显示 macOS 的控件。
抽象工厂接口声明一系列构建方法, 客户端代码可调用它们生成不同风格的 UI 元素。 每个具体工厂对应特定操作系统, 并负责生成符合该操作系统风格的 UI 元素。
其运作方式如下: 应用程序启动后检测当前操作系统。 根据该信息, 应用程序通过与该操作系统对应的类创建工厂对象。 其余代码使用该工厂对象创建 UI 元素。 这样可以避免生成错误类型的元素。
使用这种方法, 客户端代码只需调用抽象接口, 而无需了解具体工厂类和 UI 元素。 此外, 客户端代码还支持未来添加新的工厂或 UI 元素。
这样一来, 每次在应用程序中添加新的 UI 元素变体时, 你都无需修改客户端代码。 你只需创建一个能够生成这些 UI 元素的工厂类, 然后稍微修改应用程序的初始代码, 使其能够选择合适的工厂类即可。
1 2 3 4 5 6 7 8 9 10 11 12 13 14 15 16 17 18 19 20 21 22 23 24 25 26 27 28 29 30 31 32 33 34 35 36 37 38 39 40 41 42 43 44 45 46 47 48 49 50 51 52 53 54 55 56 57 58 59 60 61 62 63 64 65 66 67 68 69 70 71 72 73 74 75 76 77 78 interface GUIFactory is method createButton () :Button method createCheckbox():Checkbox // 具体工厂可生成属于同一变体的系列产品。工厂会确保其创建的产品能相互搭配 // 使用。具体工厂方法签名会返回一个抽象产品,但在方法内部则会对具体产品进 // 行实例化。 class WinFactory implements GUIFactory is method createButton():Button is return new WinButton() method createCheckbox():Checkbox is return new WinCheckbox() // 每个具体工厂中都会包含一个相应的产品变体。 class MacFactory implements GUIFactory is method createButton():Button is return new MacButton() method createCheckbox():Checkbox is return new MacCheckbox() // 系列产品中的特定产品必须有一个基础接口。所有产品变体都必须实现这个接口。 interface Button is method paint() // 具体产品由相应的具体工厂创建。 class WinButton implements Button is method paint() is // 根据 Windows 样式渲染按钮。 class MacButton implements Button is method paint() is // 根据 macOS 样式渲染按钮 // 这是另一个产品的基础接口。所有产品都可以互动,但是只有相同具体变体的产 // 品之间才能够正确地进行交互。 interface Checkbox is method paint() class WinCheckbox implements Checkbox is method paint() is // 根据 Windows 样式渲染复选框。 class MacCheckbox implements Checkbox is method paint() is // 根据 macOS 样式渲染复选框。 // 客户端代码仅通过抽象类型(GUIFactory、Button 和 Checkbox)使用工厂 // 和产品。这让你无需修改任何工厂或产品子类就能将其传递给客户端代码。 class Application is private field factory: GUIFactory private field button: Button constructor Application(factory: GUIFactory) is this.factory = factory method createUI () is this .button = factory.createButton () method paint () is button.paint () class ApplicationConfigurator is method main () is config = readApplicationConfigFile () if (config.OS == "Windows" ) then factory = new WinFactory () else if (config.OS == "Mac" ) then factory = new MacFactory () else throw new Exception ("错误!未知的操作系统。" ) Application app = new Application (factory)
参考
大话设计模式、UML、设计模式Java版完全总结 Refactoringguru